|
|
|
|
|
|
|
Tutorials |
|
How to create
inspiring images
First, we need an
interesting
foundation for our
image. There are
three ways to
achieve this:
-
Go to the "Design" tab in Mystica. Click the
random settings
button multiple
times until a useful
image design
appears:

-
In "Design",
cycle through the
presets. Mystica
comes with an
initial set of
preset images. Feel
free to extent the
collection with your
own creations:
-
Download mystica
images from the
gallery and alter
them:
Exit your mystica
session
Click
here to
see the gallery
Click on any ".mys"
and open it. This
will start Mystica
and add the image to
the gallery. Then,
click the "Edit"
button to bring up
the Design
window
Once a useful image
source is found, we
proceed by adapting
the viewport to
focus on the image
section we are
interested in. Pan
the image by holding
left mouse button
down and moving the
mouse while in the
viewport window.
Similarly, zoom by
clicking the
magnifier button and
drawing a rectangle
which will become
the new viewport.
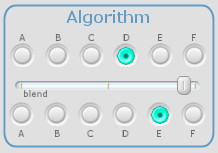
Next, check out the
algorithm slider:

Move the slider
slowly to left and
right and check if
the image improves.
Remember to use the
multilevel undo and
redo buttons to go
back and forth in
your edit history.
Now do the same with
the chaos slider:

The slider adds more
chaotic structures
to your image when
moving to the right
or left side. the
central position
usually gives
asmooth low
frequency image
content.
Again, refine your
viewport by mouse.
Take a snapshot of
your image ("Save"
button) and see if
you can alter the
image even more
while preserving its
overall design.
Use the shuffle
button to do so:

Hit the button
multiple times. The
deeper the zoom
level, the stronger
the changes.
If
the results are not
better, click the
"Load" button to
revert the changes.
Finally, set the
iteration depth:

Start in the
leftmost position
and move the slider
to the right until
all details are
visible. Setting
high positions will
increase rendering
time and rarely
improve the image
compared to a
central position.
|
You should see now an
interesting
design that
still misses the
most important
feature: proper
coloring. |
|
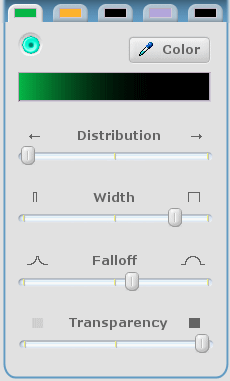
An explanation
of the color
controls is
here.
The best color
schemes can be
found in the
following way:
Use 2 or 3 of
the 5 color
tabs to assign
the basic
colors. Then
enable the next
free color block
and assign a
bright color.
Move the
"Width"
slider to the
left.
Now start with a
leftmost
"Distribution"
slider
position and go
slowly to the
right until you
are satisfied
with the color
highlight. |

|
The following Mystica
generated video
shows the effect of
just moving the
highlight position
from left to right:
video
(500k)
.mys file
See how placing the
highlight position
improves the image
and completely
changes the
perceived volume
depending on where
it is placed.
Use the transparency
slider to dim the
highlight effect.
Once you are
satisfied with image
design and color,
click the DONE
button to render it.
Then, apply
effects.
back to Tutorials
|
|
|
|
|
|
|
Keywords: image generator, fractal, fractal landscape, bitmap, texture,
generator, art, gallery, graphics, 2D, 3D, fly through,
HTML, gallery,
create, image, images, shareware, movie, video, 3D engine, website, asset,
content, explore, effects, filter,
design, art design, tool, picture,
render
Copyright ©2000-2008 by Dawntec. All
rights reserved. |
|


