|
|
|
|
|
|
|
Tutorials |
|
Effects
Section

The effects window
consists of 5
sections (Input,
Filter, 3D Light,
Layer, Color)
connected by arrows.
These arrows define
the data flow (e.g.
Filter comes before
3D Light). Of course
all effects can be
explored in random
order, the arrows
simply illustrate
their routing.
Note that the effect
section works for
both still images
and movies.
Input
The first section,
input, selects
either an image or
video from the
gallery or allows to
use an image of any
(even non-mystica)
source by clicking
paste.
Filter
Next comes the
filter section.
There are three
items to play with:
-
Filter Type: Selects
the filter kernel
being applied to the
image
-
Kernel size: Defines
the influence of the
filter. Note that
this depends on the
image size, large
images need high
kernel sizes
-
A slider blending
between the original
image and the
filter-altered image
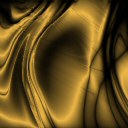
Here is an example:
Assume this
input image (.mys).
To enhance,
we try to
emphasize the
irregular
stripe
pattern.
This will add
a nice texture
to the
otherwise too
smooth design.
|
 |
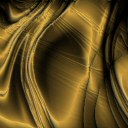
We achieve
this by using
an edge
filter, in
this
case "edge2".
A high kernel
size is
selected as we
want a broad
edge effect
rather than
local bumps. |
 |
The upper
image effect
was obviously
too strong.
We now blend
the effect of
the edge
filter with
the original
image by
moving the
blend silder
more
to the
left.
Finally, the
original image
is slightly
enhanced. |
 |
3D Light
The 3D Light section
computes a 3D
profile based on the
pixel brightness and
allows to light this profil with respect
to different
parameters.
The lighting works
best if the previous
filter section uses
the "soften" filter.
Depending on the
light direction,
holes and bumps can
be inverted. The
light and shadow
color colorize the
image. usually, the
light color is
chosen to be bright
and shadow dark. Try
dark light colors to
dim the image in
those areas facing
the light.
The following
"Material" slider
defines the
specularity of the
3D profile. Usually
you will choose
rightmost positions
to give the image
more depth.
As with all effect
sections, the last
slider blends the
effect result image
with the original
image.
Layer
This section allows
to composit images
of any source. It is
enabled by pasting
an image. The
simplest example is:
click "copy image"
in the effects
output section and
"paste image" in the
layer section. You
will see the image
itself superimposed.
Use the zoom slider
to resize the pasted
image. In
cunjunction with the
layer mix mode (add,
sub, xor etc),
different designs
will result. To
reduce the effect,
use the brightness
slider.
There is no typical
sequence in using
layering - simply
play with all
controls.
To get a layer ontop
of an existing
layer, click "copy
image" in the
effects output
section and click
"paste image" in the
input section. Now
the two previous
layers from a new
image which can be
layered again.
Note that this layer
section can be used
to blend some
copyright
information or your
name into images and
onto each movie
frame.
Adjust
The section
offers the usual
brightness,
contrast, and gamma
sliders.
back to Tutorials
|
|
|
|
|
|
|
Keywords: image generator, fractal, fractal
landscape, bitmap, texture, generator, art, gallery, graphics, 2D, 3D, fly
through,
HTML, gallery, create, image, images, shareware, movie, video, 3D
engine, website, asset, content, explore, effects, filter,
design, art
design, tool, picture, render
Copyright ©2000-2008 by Dawntec. All
rights reserved. |
|

